
 Guide Categories
 Quick Poll
3D printing isn’t just about machines and materials — it’s about the software that turns imagination into a tangible object. Whether you’re creating a custom phone stand, a mechanical prototype, or a full-scale architectural model, the journey begins long before the printer starts. It starts inside your computer.
Every great 3D print begins with a digital blueprint, and that blueprint is shaped, refined, and translated into printer-ready instructions by software. From the first sketch to the final layer, software drives every stage of 3D printing — controlling precision, surface quality, speed, and even material efficiency.
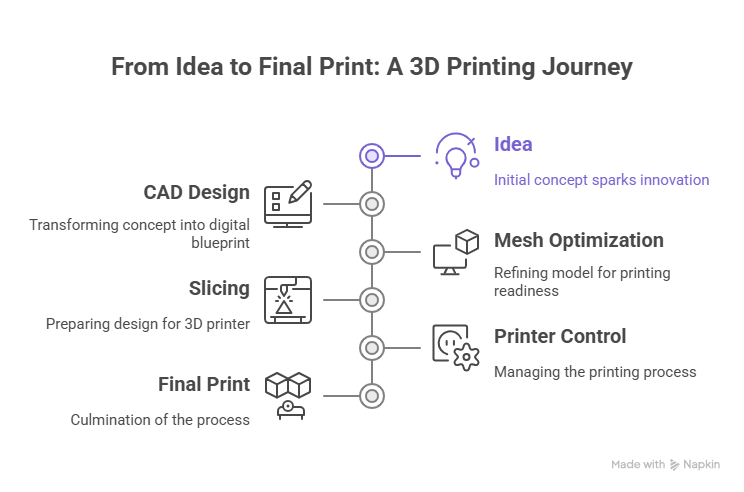
Think of it as a chain reaction:
- A CAD program lets you design the model with dimensions and structure.
- A Design or Mesh Tool cleans up and repairs the model for printing.
- A Slicer then converts that model into the step-by-step instructions your printer understands.
These three categories — CAD, Design/Mesh Tools, and Slicers — form the backbone of modern 3D printing. Together, they shape the outcome of every print job, no matter how simple or complex.
Choosing the right combination of software can be the difference between a perfect print and a frustrating failure. Good software improves accuracy, reduces material waste, and saves valuable print time. Poor software choices can lead to warped edges, failed supports, or surfaces that need hours of post-processing.
In short – 3D Printing Softwares:
Your print is only as good as your design workflow.
Mastering these tools isn’t just about learning to click buttons — it’s about understanding how digital design transforms into real-world results.
3D Printing Workflow & Role of Software
Before your 3D printer starts humming, a precise digital process unfolds behind the scenes. Each stage — from sketch to final print — plays a vital role, and different types of software take over at each step. Let’s break it down clearly:
Design Creation (CAD Tools)
This is where ideas take shape.
CAD (Computer-Aided Design) software allows you to create, modify, and visualize 3D models with mathematical precision. Whether you’re designing an engineering part in Fusion 360 or sculpting a figurine in Blender, this stage is where creativity meets structure.
- Goal: Build a detailed and dimensionally accurate 3D model.
- Output: A digital file (usually
.STLor.OBJ) ready for optimization.
💡 Pro tip: Always design with the end printer in mind — small nozzle sizes and material shrinkage can influence final dimensions.
Model Optimization (Mesh Editing & File Repair Tools)
Even well-designed models can contain hidden issues like holes, non-manifold edges, or intersecting geometry — things your printer can’t interpret correctly.
Mesh tools like Meshmixer, Netfabb, or Blender help analyze, repair, and prepare the 3D model for slicing. This ensures smooth printing with fewer surprises.
- Goal: Create a watertight, printable model.
- Output: A fully optimized file, free from mesh errors.
💡 Pro tip: Run an “analyze and repair” check before exporting to save hours of wasted print time and material.
Slicing (G-code Generation)
Now comes the translator’s job.
A slicer converts your 3D model into G-code — the language your printer speaks. It divides the model into horizontal layers and calculates the exact movements, temperature, speed, and extrusion paths the printer must follow.
Popular slicers like Cura, PrusaSlicer, or Simplify3D also let you tweak settings such as layer height, infill density, and support structures to fine-tune results.
- Goal: Generate precise printer instructions (G-code).
- Output: G-code file ready to print.
💡 Pro tip: Preview each sliced layer in your slicer’s simulation mode. It helps spot weak supports or missing sections before you print.
Printer Communication & Monitoring
Finally, the G-code is sent to your printer — either through USB, SD card, or Wi-Fi.
Modern tools like OctoPrint or Bambu Studio let you remotely monitor prints in real-time, adjust temperature, and even stop a print if something goes wrong.
- Goal: Manage and monitor printing for consistent output.
- Output: A successfully printed object with minimal errors.
💡 Pro tip: Keep firmware and slicer settings synchronized — mismatched versions often cause communication issues or unexpected print behavior.
CAD Software for 3D Printing
When it comes to 3D printing, CAD (Computer-Aided Design) software is where everything begins. This is where ideas become tangible digital models — accurate down to fractions of a millimeter. Whether you’re designing a custom phone holder or an industrial machine part, CAD tools define how precise, printable, and efficient your design will be.
Purpose:
To create, modify, and perfect 3D models that can be converted into printable files (usually in STL or OBJ format). A good CAD model ensures structural stability, balanced proportions, and printability from the very first layer.
Types of CAD Software
There are two main categories of CAD software used in 3D printing — Parametric CAD and Direct Modeling CAD. Both are powerful, but they serve different creative and technical needs.
Parametric CAD (for precision and mechanical design)
Parametric CAD tools let you create models based on parameters — like dimensions, angles, and constraints. You can modify one parameter (say, the width of a gear) and the entire model updates automatically.
These tools are ideal for engineers, architects, and designers working with functional parts that require tight tolerances and mathematical accuracy.
Popular Choices:
- Autodesk Fusion 360: Great for both mechanical and artistic projects, with built-in simulation and CAM tools.
- SolidWorks: Industry-grade precision software used in manufacturing and engineering design.
- FreeCAD: An open-source alternative with modular architecture and parametric control.
💡 Tip: If you’re designing parts that must fit or move together, always go for parametric modeling. It saves hours of manual rework.
Direct Modeling (for creative freedom and quick changes)
Direct modeling tools give you more artistic control. You can push, pull, and sculpt shapes intuitively without worrying about strict parameters. These are perfect for concept art, organic shapes, and quick prototypes.
Popular Choices:
- TinkerCAD: A beginner-friendly online tool — great for learning and quick projects.
- SketchUp: Favored by architects and product designers for its simplicity.
- Rhino3D: A hybrid modeler with precise geometry and artistic freedom.
💡 Tip: Direct modeling tools are best when you want to experiment freely — like designing art pieces, toys, or sculptural models.
Comparison Table
| Software | Free/Paid | Best For | Learning Curve | Platforms |
|---|---|---|---|---|
| Fusion 360 | Paid | Mechanical / Engineering | Medium | Windows / Mac |
| FreeCAD | Free | Beginners & Open Source Users | Moderate | Windows / Mac / Linux |
| SolidWorks | Paid | Industrial / Professional | High | Windows |
Expert Tips
- Choose parametric modeling for mechanical accuracy and moving parts; use direct modeling for creativity and flexibility.
- Always export in STL or OBJ formats for 3D printer compatibility.
- Run a mesh repair check (using tools like Meshmixer or Netfabb) before slicing to avoid costly print errors.
- Learn shortcuts and constraints — they drastically improve modeling speed and accuracy.
Design & Mesh Editing Tools
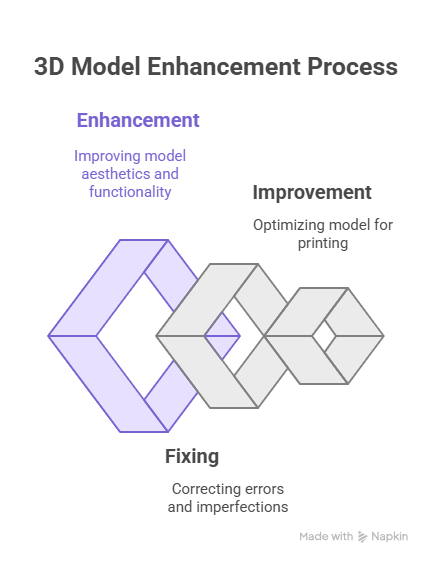
Once your model is created, the next step is to make it print-ready. Even the best CAD designs often need fine-tuning — smoothing surfaces, fixing errors, or preparing supports. This is where Design and Mesh Editing Tools come in.
These tools ensure that your model is clean, optimized, and suitable for the physical world. Think of them as digital sculpting and repair kits that bridge the gap between design and print.
Purpose:
To refine, repair, and optimize your 3D model before slicing — ensuring smooth printing, reduced failures, and better material efficiency.
Key Tools
1. Meshmixer (Autodesk)
One of the most versatile tools for preparing 3D prints. Meshmixer can auto-repair holes, scale objects, hollow models, and even add custom supports for resin or FDM prints.
- Great for fixing complex models imported from CAD or 3D scans.
- Offers intuitive sculpting tools for small edits and tweaks.
💡 Pro tip: Use the “Analysis → Inspector” feature in Meshmixer to automatically find and repair geometry errors in seconds.
2. Blender
An open-source powerhouse, Blender is used for both artistic and functional 3D design. Beyond animation and rendering, it’s great for organic modeling, surface smoothing, and mesh decimation (reducing polygon count for faster slicing).
- Best for artists and advanced hobbyists.
- Offers modifiers for cleaning and refining models before printing.
💡 Pro tip: Use the “3D Print Toolbox” add-on in Blender — it checks wall thickness, volume, and overhangs before export.
3. Netfabb / Lychee / 3D Builder
- Netfabb: Industrial-grade mesh repair and analysis tool (by Autodesk). Detects non-manifold edges and automatically fixes them.
- Lychee: Perfect for resin printing — adds smart supports and optimizes hollowing.
- 3D Builder (Windows): Simple yet effective tool for beginners to repair STL files and scale models.
💡 Pro tip: Always export a watertight (closed) mesh — open edges can cause slicing issues or incomplete prints.
Pro Insights
- Check for non-manifold geometry (unconnected or floating edges) — your printer won’t understand them.
- Decimate meshes to reduce file size — it speeds up slicing and printing without losing noticeable detail.
- Hollow your models (especially for resin prints) — it saves material and reduces suction pressure during printing.
- Test small sections first before printing the full model, especially when working with complex designs.
These design and mesh tools act like the quality control stage before production. They give you confidence that what you see on-screen will match what you hold in your hands.
“A flawless print always begins with a flawless mesh.”
Slicer Tools
Once your model is designed and repaired, the next step is to translate it into language your printer can understand — that’s where slicer software comes in.
Slicers are the “middlemen” between your 3D model and your 3D printer. They take your finished model and slice it into thin horizontal layers, generating precise printing instructions known as G-code. These instructions tell your printer exactly how to move, when to extrude, what temperature to maintain, and how fast to print.
Purpose:
To convert your 3D model into printer-readable G-code, optimizing every detail of print quality, speed, and material usage.
Core Functions
A slicer does much more than just cut your model into layers. It controls several crucial parameters that directly affect the final outcome:
- Layer Slicing: Breaks your model into hundreds or thousands of printable layers, defining how fine or coarse your surface will look.
- Infill Density: Determines how solid or hollow your object will be — balancing strength with material efficiency.
- Print Speed: Adjusts how fast the nozzle moves and extrudes material, affecting both time and detail.
- Support Generation: Adds temporary structures to hold overhanging sections during printing.
- Bed Leveling & Adhesion Settings: Ensures the first layer sticks properly to the print bed for a stable foundation.
💡 Pro Tip: A slower print speed usually improves surface finish, especially for curved or detailed parts.
Popular Slicer Software
Each slicer offers different strengths depending on your printer type, experience level, and printing goals.
Ultimaker Cura (Free, Open Source)
- One of the most popular slicers in the world.
- Beginner-friendly interface, powerful customization, and regular updates.
- Works with nearly every FDM printer.
- Includes adaptive layers, material profiles, and plugins for advanced users.
💡 Tip: Use Cura’s “Preview Mode” to visually inspect each print layer — it’s the easiest way to spot support or infill issues.
PrusaSlicer (Free)
- Developed by Prusa Research, but compatible with most printers.
- Advanced support generation and customizable infill patterns.
- Strong focus on print accuracy and fine-tuning.
- Built-in print farm management features.
💡 Tip: Perfect for intermediate users who like full control over every setting — from temperature to retraction.
Simplify3D (Paid)
- A professional-grade slicer designed for reliability and industrial performance.
- Delivers optimized G-code with customizable supports and multi-extruder control.
- Known for smoother surface finishes and minimal print artifacts.
💡 Tip: Simplify3D is great if you manage multiple printers or use complex materials that require precision tuning.
Bambu Studio, ChiTuBox, and Lychee Slicer
- Bambu Studio: Tuned for Bambu Lab printers, offers advanced AI calibration and lightning-fast slicing.
- ChiTuBox: Designed for resin (SLA/DLP) printers — generates smart supports automatically.
- Lychee Slicer: A favorite for resin printing — features intuitive layout, real-time error checks, and hollowing tools.
💡 Tip: For resin printing, always hollow models and add drain holes in the slicer to avoid suction and cracking.
Comparison Matrix
| Slicer | Free/Paid | Ideal Printers | Special Features | Skill Level |
|---|---|---|---|---|
| Cura | Free | All FDM printers | Adaptive layers, material profiles | Beginner–Pro |
| PrusaSlicer | Free | Prusa & compatible | Advanced supports, detailed settings | Intermediate |
| Simplify3D | Paid | Industrial & Pro printers | Multi-extrusion, precision tuning | Pro |
Expert Tips
- Layer Height Rule: Keep layer height between 25–50% of your nozzle diameter for best balance of detail and speed.
- Save custom printer profiles — they ensure consistent quality across prints.
- Always use preview mode to detect gaps, weak supports, or adhesion problems before printing.
- Match filament profiles with material type — PLA, ABS, PETG, and resins all behave differently under heat.
“A slicer is not just software — it’s your print’s blueprint interpreter.”
Specialized & AI-Powered Tools
3D printing technology is evolving fast — and now, AI and automation tools are changing the way designers model, optimize, and manage their workflows. These specialized tools help you design smarter, print stronger, and collaborate better.
AI-Assisted Modeling Tools
AI-driven tools like Gravity Sketch, Runway ML, and Autodesk Generative Design let you create complex geometries automatically.
- AI can predict optimal design structures based on strength and material requirements.
- Generative Design suggests multiple shape alternatives optimized for performance and minimal material use.
💡 Example: Engineers use generative design to create aircraft components that are 40% lighter yet equally strong.
Topology Optimization
This process refines your model to use the least material possible while keeping maximum strength.
- Perfect for aerospace, automotive, and medical applications.
- Works hand-in-hand with AI modeling tools for efficiency and sustainability.
💡 Tip: Topology optimization is ideal when you want lightweight yet durable designs for metal or carbon fiber prints.
Cloud-Based Collaboration
Modern CAD ecosystems like Onshape and MakerOS offer real-time collaboration, allowing multiple designers to edit and review a project simultaneously.
- Eliminates file version confusion.
- Enables teams to work from anywhere.
- Integrates with slicers and project management tools.
💡 Tip: Cloud tools are invaluable for remote teams and startups managing product development cycles.
Simulation Tools
Before you print, simulation software can predict stress points, thermal distortion, and warping — saving both time and material.
- Tools like Autodesk Fusion 360 Simulation, ANSYS Additive Suite, and Simufact Additive help validate designs before production.
💡 Tip: Always simulate when using metal printing — it prevents costly trial-and-error runs.
“AI tools don’t replace designers — they empower them to think and print smarter.”
File Management & Workflow Integration
3D printing involves multiple files, formats, and revisions — and without proper organization, even the best designs can get lost in the shuffle. Efficient file management keeps your workflow clean, consistent, and ready for scaling.
Common File Types
- STL (.stl): The most common 3D printing format, representing the model’s surface geometry.
- OBJ (.obj): Supports color and texture — ideal for artistic or multi-material prints.
- AMF (.amf): Advanced file type with material and color data.
- 3MF (.3mf): Modern standard supporting metadata, color, textures, and materials in one file — perfect for professional workflows.
💡 Tip: Prefer 3MF when working across teams or using full-color or multi-material printers — it preserves all design data in one compact file.
Backup & Version Control
Just like software developers, 3D designers benefit from version control.
- Use Git-based systems or cloud CAD tools like Fusion 360 or Onshape to manage design versions.
- Always maintain a backup of your final sliced G-code and original design files.
💡 Tip: Create a simple folder structure like
/ProjectName/Designs/Repairs/Slices/Final Prints— it makes future revisions effortless.
Recommended Workflow
The most efficient 3D printing process follows a clear, repeatable path:
➡ CAD Design → Mesh Repair → Slicing → Print Monitoring → Feedback & Iteration
Each stage informs the next — improving accuracy, reducing waste, and refining your print quality over time.
💡 Pro Tip: Keep a short note log for each project — what worked, what didn’t. It speeds up troubleshooting for future prints.
“A well-managed workflow turns 3D printing from a hobby into a professional-grade production system.”
Pro Tips & Best Practices
Even the most advanced 3D printer can only perform as well as the software guiding it. These pro tips will help you get consistent, high-quality prints — and save valuable time and material in the process.
Keep Consistent Units Across Software
Always use the same measurement units (millimeters or centimeters) across all your design and slicer tools.
Mixing units can lead to scaling errors — a model that should be 10 cm tall may end up as 10 mm!
💡 Pro Tip: Set your default units to millimeters — it’s the standard in most 3D printing software.
Test Before Production
Before printing large or complex parts, run a test print using a simple model like 3DBenchy or a calibration cube.
These small test prints help you verify:
- Bed adhesion
- Layer consistency
- Extrusion accuracy
- Dimensional precision
💡 Pro Tip: Make testing a routine — one 30-minute calibration can save hours of wasted printing.
Optimize for Minimum Supports
Supports are necessary for overhangs, but they also consume material and increase print time.
- Design models with natural self-supporting angles.
- Use slicer tools to tune support density and placement only where essential.
- For resin prints, position models at slight angles to reduce flat suction areas.
💡 Pro Tip: Less support = less post-processing and faster cleanup.
Explore Plugins & Extensions
Modern 3D software allows integration with plugins that enhance workflow.
- In Cura, use plugins for OctoPrint connectivity, time estimations, and filament tracking.
- In Blender, install 3D printing add-ons for wall thickness checks and overhang analysis.
- In Fusion 360, explore AI-driven extensions for generative design or simulation.
💡 Pro Tip: The right plugin can automate repetitive tasks and improve design efficiency.
Keep Software Updated
Regular updates don’t just add features — they fix bugs, improve slicing algorithms, and optimize printer profiles.
Always stay current with:
- Your CAD software version
- The slicer used for generating G-code
- Your printer’s firmware
💡 Pro Tip: Enable auto-update notifications. Even minor updates can solve print quality issues you didn’t know were software-related.
“Consistency, calibration, and curiosity — the three pillars of perfect 3D prints.”
Conclusion
3D printing is more than machines and materials — it’s the synergy of software that transforms imagination into precision.
Each stage — design, repair, slicing, and monitoring — works together to define how successful your final print will be.
The more you understand your software stack, the more control you gain over quality, time, and creativity. Whether you’re printing prototypes, art pieces, or functional components, every adjustment you make in software translates directly into better real-world results.
For beginners, start simple — explore free tools like TinkerCAD, Cura, and Meshmixer. For professionals, master Fusion 360, Simplify3D, or Blender to unlock deeper customization and precision.
Because in 3D printing, knowledge is power, and software mastery is the foundation of excellence.